**This giveaway is now CLOSED**
Time for another sidebar text link giveaway! Enter your link here for a chance to win one of five spots on The Idea Room Sidebar. One comment per person please. Giveaway ends soon!

Sunday, February 27, 2011
Friday, February 18, 2011
Calling All Angels--Service Opportunity
My husband and I wanted to do a service project in honor of our son Jayden’s 1 year birthday. He was born at 23 weeks old on May 30, 2009 and was just too small to pull through. We posted the service idea on our blog and entitled it “Calling All Angels” asking anyone that wanted to could help by donating baby blankets. We were overwhelmed by the outpouring of support we received by so many, friends, family, and even strangers.
Thursday, February 17, 2011
Let’s Help Bring Brady Home!
I have mentioned before that I would love for this community to be something were we can work together and create a network of support for our causes and a place where we can come and discuss and share ideas with each other. I hope you will become a follower and join with us so it can continue to grow.
One of my readers, Cathy from Cap Creations, contacted me about helping her get the word out about a special cause that is dear to her heart.
Monday, February 14, 2011
Disney On Ice Giveaway Winner #3
Who won the Disney on Ice Tickets?

Commenter #2 Amber Hall…I have two little girls who would love nothing more than to see this show.
Congratulations Amber! Send me an email {2theidearoom@gmail.com} to claim your 4 tickets! Thanks everyone for playing along!
Saturday, February 12, 2011
Pillow Tutorial--Guest Post From Ameroonie Designs
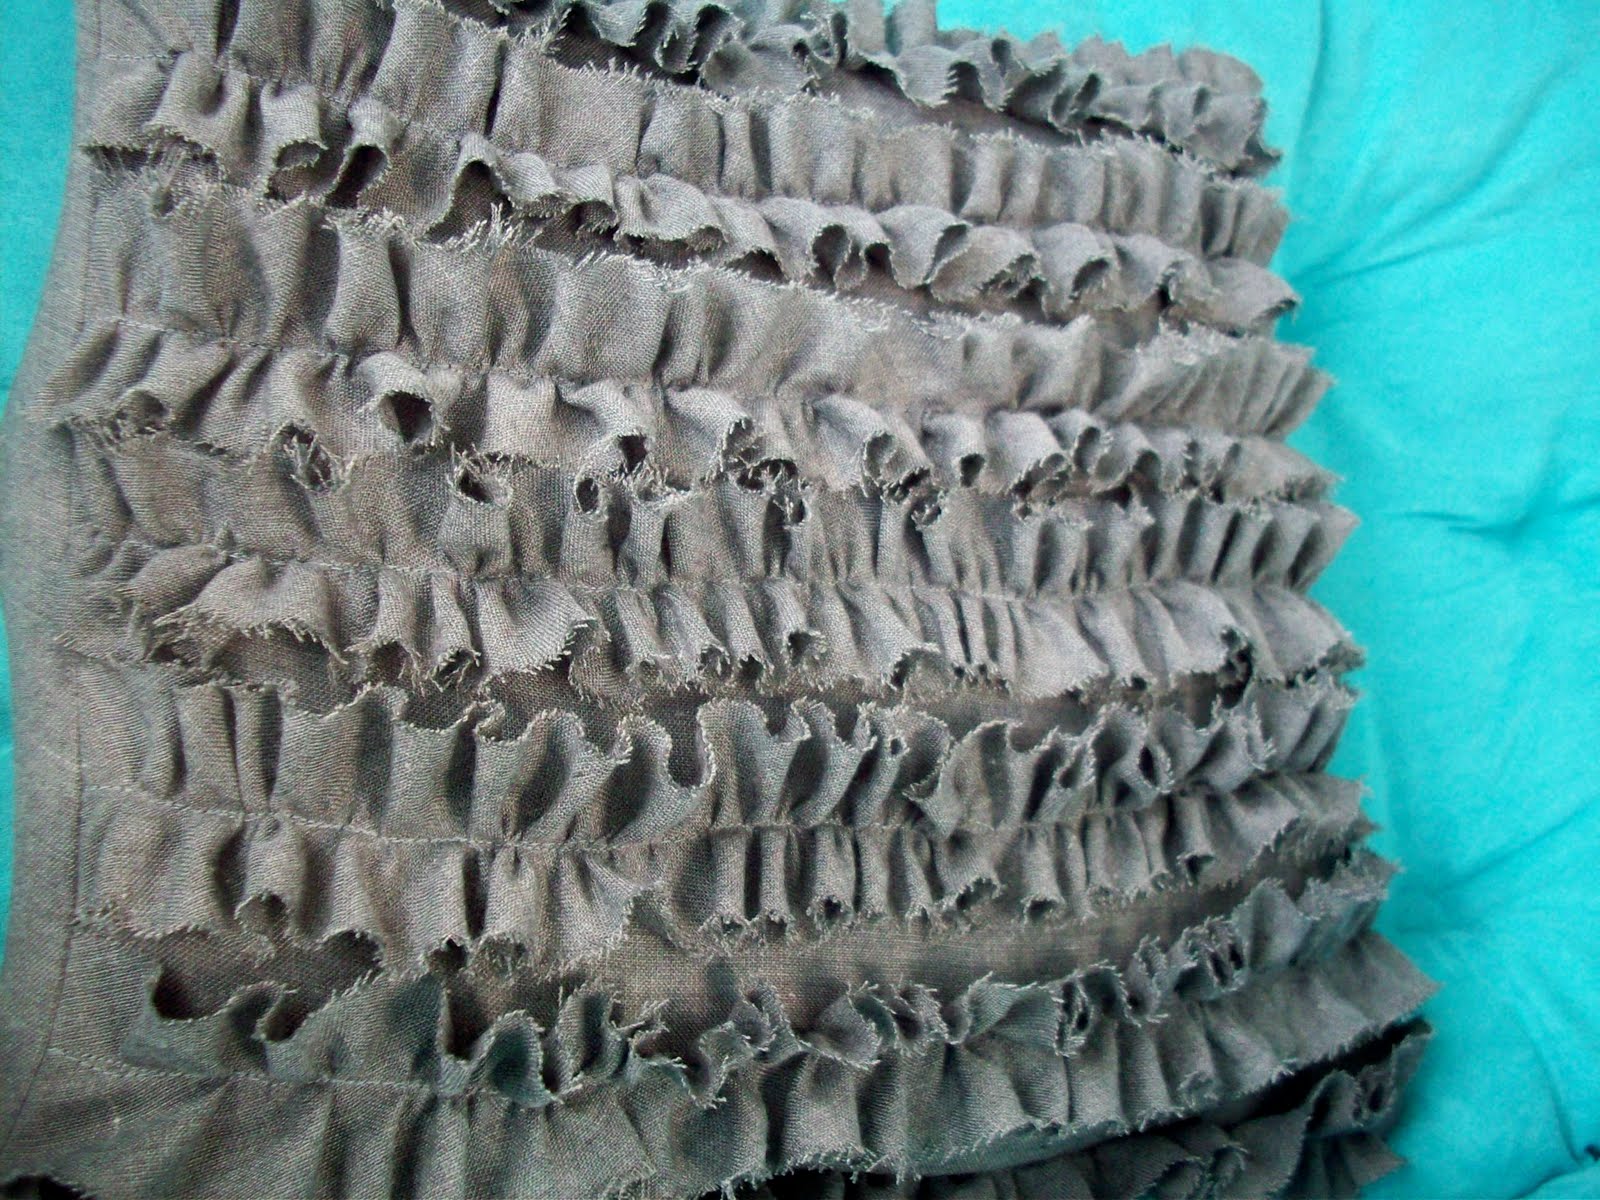
 Hi there Idea Room Community! I'm Amy from Ameroonie Designs. Amy was so kind to let me come over and spend some time with all you lovely people! I am thrilled to share with you my tutorial on how to make this side-tie pillow. I have to admit- this is one of my favorite pillows to make. I love that it lets me show off a fabric, while adding texture with the bows. (you can see the others I have made here and here).
  First you will need to start with a pillow form. This will dictate the measurements of the fabric you are cutting. The pillow I made was 12" by 16". You will need to cut: 1 pillow back- the measurements of your pillow + 1" (mine was 13" X 17"), 2 pieces for the front- take the length of the front piece (on mine 17), divide by 2 (I rounded up to 9) and add 4"- (my pieces were 13" X 13"). This will give you enough off-set that the bows will be on the side- but you are welcome to adjust the measurements (make one longer so the bows will be even further to the edge). Then you will need six ties. I am using a wool felt for this pillow, so I'm not worried about fraying- so mine are 13" by 3/4", but if you are using a fabric that frays, make the ties 1 1/2" so you can fold in the edges. (you can make the ties longer if you want a larger bow- but I'd keep them no longer than about 16" or they just get too long)
  Take your ties and fold them in half. {If it's a fabric that frays you will press this fold, open it up, bring the raw edges into the fold line and press those folds. Then re-fold the center crease so the raw edges are tucked into the center. Fold up one short end into the crease so the raw edge is hidden.} Then edge stitch both sides of the tie- keeping the folded edges as close together as you can. Set them aside.
  Take your two front pieces. Hem one side of each front panel by first folding the edge over 1", press, then fold over another 1". Top stitch at 3/4" and edge stitch the fold. (make sure the sides you're hemming are the ones you want to overlap. Lay the back panel of the pillow on a flat surface. Line up the top pieces so they overlap, using the back panel as a guide for the width of the pillow.
  Take the front panel that will be on top of the pillow and fold it in half along the hemmed side. Mark the center with a pin.
  Decide how far apart you want your ties to be- remembering that you will be sewing around the perimeter with a 1/2" seam allowance to finish the pillow. Mine were 3". Mark each measurement from the center pin.
  Now we're going to place the ties. If you are using a fabric that frays- you will pin them down as shown by the tie with the pink pin, folding over the end about 1/2". When placing the tie onto the panel that is underneath, I usually put the tie about 1/4" from the edge of the top panel. Pin all the ties in place and sew them down.
  We're almost done! But this is the step that always makes me stop and think- so follow along with me! Take your back panel and place it on a flat surface RIGHT SIDE UP. Now take the front panel that will be on the TOP (ties should be sewn close to the hemmed edge) and place it on the back panel RIGHT SIDE DOWN. Match up the corners and edges and pin in place. Now take the remaining panel and pin it down. Make sure all the ties are tucked into the middle and won't get caught in the seam, or interfere with the placement of the front panels.
Here it is all ready to be sewn. Sew around the entire pillow using a 1/2" seam allowance.  Clip all the corners and turn the pillow right side out. Use a tool to push out the corners as much as you can. Now just insert your pillow form and tie your bows!
 Clip all the corners and turn the pillow right side out. Use a tool to push out the corners as much as you can. Now just insert your pillow form and tie your bows!
 Some more shots of the pillows. I'm loving this gray, now I'm wondering where in my house I can put some! 


Have Fun!
xoxo,
Amy
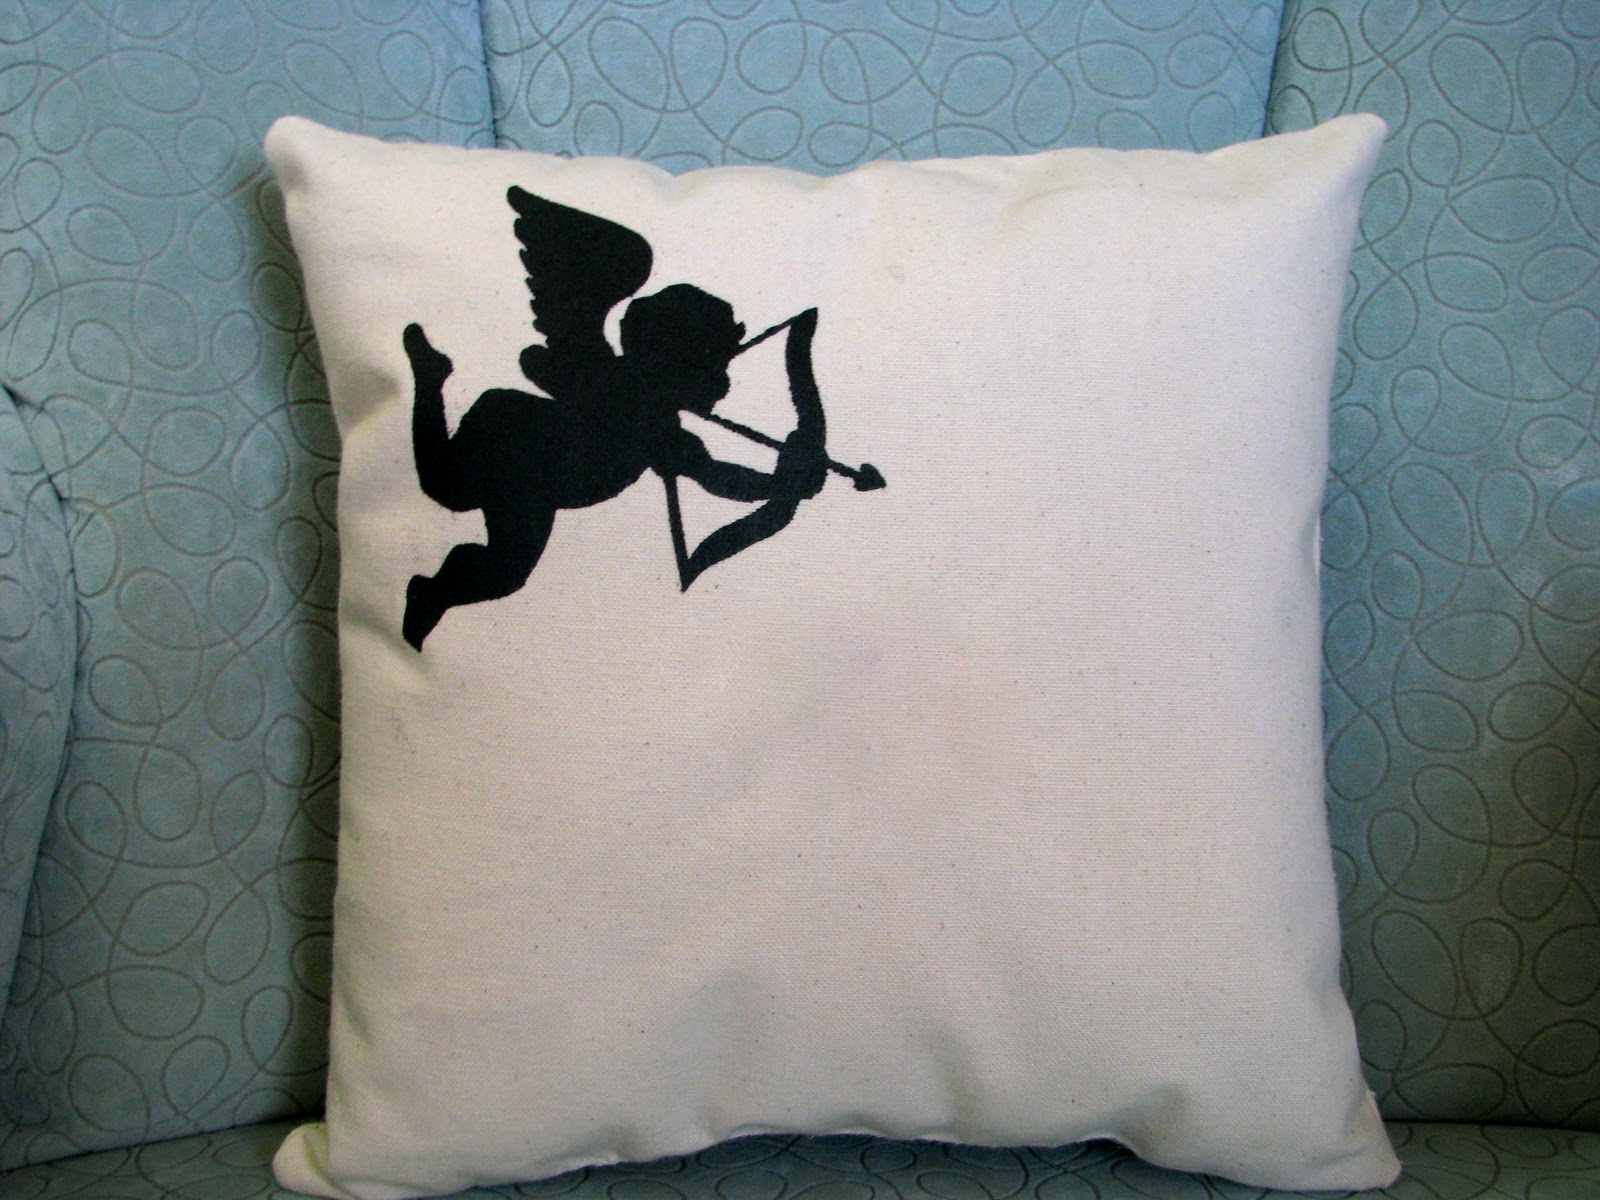
Thanks so much Amy. We love them! To see more great projects make sure and head on over to Ameroonie Designs and check out Amy’s other great projects and tutorials. Like this Happy Birthday Banner…

And this adorable Faux Chenile Valentine Pillow!

Friday, February 11, 2011
Disney On Ice Tickets Giveaway
**This giveaway is now CLOSED**
I have 4 more tickets to the Disney On Ice Let’s Celebrate show to give away this weekend. This will be a quick one…so be sure to hurry and get your entry in. One comment per person.

Feld Entertainment invites families to turn an ordinary day into an extraordinary one at its new ice extravaganza, Disney On Ice presents Let’s Celebrate!, featuring more than 50 classic and contemporary Disney characters in a captivating compilation of favorite holidays and celebrations from around the world.
")

The 4 Disney On Ice passes are good for the Wed., March 9th 7:00 p.m. performance, the Thursday, March 10th 7:00 p.m. performance and the Friday, March 11th matinee performance at the Energy Solutions Arena. The passes you receive must be turned in at the box office for tickets to the performance choice before the actual day of performance. Make sure you are in the area and are able to attend before entering.
This giveaway will close on Sunday, February 13, 2011 at 11:59 pm PT. Good Luck!
Hardware Store Valentine’s—Guest Post from MyEyeQ
I just recently stumbled across some PERFECT Hardware Store Valentine’s for the manly man in your life! Seriously! These Valentines are going to be something that most men would really enjoy getting for Valentines Day. Now I don’t know about you…but I have a hard time coming up with something to get my sweetie for Valentines Day…but not this year thanks to Susan from MyEyeQ.
Look at all the great ideas she has come up with. Surely you can find something just right for your guy.
Unchain my Heart Card

Be Mine Valentine XOXO Card

Love Beyond Measure Gift & Tags

Grip on my Heart gift and Card

Main Squeeze gift tag card

Handy & Handsome Card

Most of these are just simple ways to let your guy know you are thinking about him on this special day.
But the best part is that Susan from MyEyeQ provides you with the instructions to make each one and also the free downloads. How awesome is that? Be sure to swing by and take a look at them. Thanks MyEyeQ for the great ideas.
Thursday, February 10, 2011
Sliding Door Valentines—Guest Post via Positively Splendid
I am really excited to share this fun tutorial with you today from Amy over at Positively Splendid! It is so cute and CLEVER! And I am so glad she agreed to share it here with you! Here’s Amy in her own words…

With today being the first day of February, Valentine's Day is truly just around the corner. I shared a great project here for how to make some plantable Valentines with your little ones, but that project is admittedly somewhat time consuming. Today I thought I'd share a Valentine idea that is equally as cute, but with a much smaller time requirement! Once I got used to the whole process for making these Sliding-Door Valentines, it only took me about 10 minutes or so to put one together.
Wednesday, February 9, 2011
Stenciled Ceiling--Not Just A Housewife Guest Post
So excited to share with you an awesome stenciled ceiling tutorial from my friend Stacy from Not Just a Housewife. You are seriously going to love this. I am now trying to decide if this could work in my room! I love this and know you will too.
I have been so excited to share this project with you!!! I loved my bedroom before but now I LOVE love it :)

I stenciled a damask pattern on the entire ceiling!!!
Tuesday, February 8, 2011
eBook & Disney on Ice Giveaway Winners
The FIVE winners for Kristen Duke’s Say NO! to Auto photography tips ebook giveaway have been chosen. All winners were chosen via random.org. If you were one of the lucky winners be sure to send me an email {2theidearoom@gmail.com} or leave a comment letting me know you won and we will get you your copy. Congratulations!
Valentine’s Day Countdown Calendar
Today we have another Guest Post from an Idea Room Reader…Cathy from Cap Creations! Cathy shares with us today her fun and Valentine’s Day Countdown with a fun activity and special daily message. Thanks for sharing Cathy!
With Valentine's Day just around the corner what better way to teach your children (or remind yourself) about love?
Side-bar text link giveaway winners—round 2
The winners of the side bar text link giveaway have been chosen via Random.org. Here are the lucky winners.

#36 KatyBug said…Yes please! I'd love to win!
Monday, February 7, 2011
Love Struck Pillow
Today we have a great tutorial for these fun silhouette Love Struck pillows. Aren’t they so cute and perfect for Valentine’s Day? I asked Ellie from Homestitched to share them with us today. Thanks Ellie!


Side Bar Space Giveaway...#2!
**This giveaway is now CLOSED**
Leave a comment to enter your blog or shop into The Idea Room Side Bar space giveaway! Only One comment per site please! This giveaway will end in a couple hours so hurry up! Thanks everyone! Five winners will be chosen via Random.org.
Leave a comment to enter your blog or shop into The Idea Room Side Bar space giveaway! Only One comment per site please! This giveaway will end in a couple hours so hurry up! Thanks everyone! Five winners will be chosen via Random.org.
Saturday, February 5, 2011
Guest Tutorial--Adore Valentine Sign by Creative Momma
Today I want to share with you an adorable Valentine's Day decoration that I just love. I asked the Creative Mommas if they wouldn't mind sharing their tutorial with you and I am so happy that they said yes! Have you seen their fun website? You will want to go and check it out...after your done here of course :)! Here they are:

Subscribe to:
Posts (Atom)