I asked Ellie from
Homestitched to share with us her tutorial for these fun pillowcases she made. I love how fun they are. Thanks Ellie!
I saw these on the Anthropologie website and knew I needed them. But who wants to pay $48 dollars for a pillow case?
So I made theses instead.
I think they turned out pretty great. Plus I finally got to use this cream and white stripped fabric I've been dying to use but haven't found the right project for.
I used the tutorial from
MADE for pillow case dimensions and basic assembly. If you need it, I suggest going there for extra help.
Materials:
About 1 3/4 yards of fabric
Wooly nylon serger thread (optional)
1. Construction:
1. 1. Cut Material. Use the chart below. You will end up with 4 rectangles. All dimensions below are in inches.
| Rectangle | Folded | Unfolded |
| Main Piece 1 | 20.5 X26 | 45 X 26 |
| Main Piece 2 | 20.5 X 11 | 45 X 11 |
| Ruffle 1 | 45 X 6 | 90 X 6 |
| Ruffle 2 | 45 X 7 | 90 X 7 |
Again, MADE has some diagrams
here that might be helpful for the main pieces. The ruffled pieces will look like this (folded in fourths):
I happened to have a large piece of fabric to use. If you do not, you may need to sew two pieces together to get the correct length for the ruffled pieces. This will be perfectly fine. The ruffles will hide any seams you don't want showing.
2. Iron the border piece in half so that you have a folded rectangle measuring 11" X 20.5".
3. Serge edges. Take both ruffle pieces and serge the long edges of each to prevent from fraying. I used wooly nylon thread and set my machine up to do a rolled hem to get the effect you see in my pictures (see your owners manual for set-up).

**If you do not have a serger I suggest doing a tight zig zag and triming the edges or using a rotary cutter to trim the edges to keep from fraying. Some sewing machines can also do a rolled hem. Check your manual. You may need an extra foot to do so.
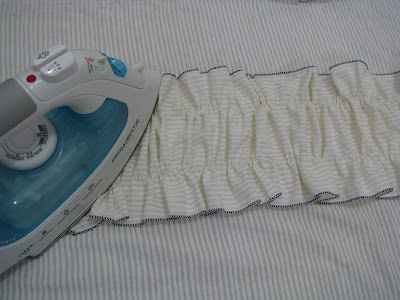
4. Iron. Take the 6" ruffle piece and iron almost in half. I allowed the bottom layer to show about 1/2 an inch (as shown below). Make sure the serged edges you want showing are facing up.
5. Gather. Set your sewing machine up for a gathering stitch (longest stitch length, highest tension). Sew about 1/4 inch down the folded edge. Do not back stitch at the front or end of the stitch.
Leave your settings the same and sew two gathering stitches about 1 1/2 inches from each side of the other strip.
Take the bobbin thread of the folded piece and pull until the piece begins to gather. Gather until it reaches the same length as the border of the pillow case.
Do the same for the other ruffled piece.
I like to lay my pieces out on the pillow case to make sure I have gathered them to the correct length.
Iron the ruffles down. This will make it easier to sew.
6. Pin. Take the folded ruffle. With right side up, align it with the edge of the pillow case where the border piece will attach. Then take the border piece and align the raw edges, right sides together to create a sandwich.
Like this.
Pin in place.
7. Sew. With a 1/2" seam, sew the sandwich together.
Thread your serger back to normal. Serge of the seems. Or zig zag stitch and trim.
Turn and Iron out the seams. No need to top stitch. This part will be covered.
Now you should have this.
8. Pin. Align the the next ruffled piece with the top edge of the border so that the ruffles just cover the border underneath but still allow the ruffles to show at the other end. Pin in place.
9. Sew. Secure the ruffle by sewing in two places. I sewed directly over the gathering stitches that were already on the ruffle. If the gathering stitch is not straight, do your best to sew a straight line as this will be visible on the completed pillow.
Use your hand to flatten down the ruffles as you sew.
Unpick any gathering stitches that are not in line with the new stitch.
Now you should have this.
Originally I planned to sew 1/4" bias tape over the top of the stitching. I liked how it looked when I got to this part, so I left it off. Your call.
10. Finish. Fold the pillow case right sides together. Pin edges and sew a 1/2 inch seam allowance.
Sege off the seems or zig zag and trim.
Turn pillow case so right sides are out and push out corners. Iron seams flat.
Put that pillow case on your pillow and rest your head a little.
Or play a little. Whichever you prefer.
Be careful..things might get a little too crazy.
So don't be surprised when your model gets grumpy and decides to take a nap instead.
Be sure to head on over to Homestitched and check out her amazing site. She has many great projects like the following:

Creative Mess Subway Art

Shirred Overalls


